Zerynth Advanced Device Manager
The Zerynth Advanced Device Manager (ADM) adds high level functionalities to connected devices:
- simpler Over The Air Firmware updates (FOTA)
- Remote procedure calls (RPC)
- Per device custom graphical interfaces
Zerynth tools strive to be as agnostic as possible and the ADM is no different. Each Zerynth user has access to an ADM sandbox instance hosted on the Zerynth servers.
The ADM will be soon compatible with most cloud providers (Azure, Amazon, Bluemix) but will also be installable on premises if needed. This way, once your product is ready for public deployment, you will be able to run an instance of the ADM on your preferred cloud with no additional effort.
How to use the ADM
All ADM functionalities are configurable and accessible both from the Zerynth Toolchain and Zerynth Studio.
The typical usage consists of a few steps:
- Device provisioning: a new device is created and added to the user’s device pool by assigning it an unique identifier (uid). During this step a security token is also generated in order to authenticate the device to the ADM. Since this authentication mechanism is not secure enough for production environment, the ADM will be soon enhanced with TLS connections and two way SSL authentication.
- Device connection: a physical device is programmed using the Zerynth ADM Library library that takes care of connecting to the ADM and receiving commands
- Template creation: a template is created and associated to the device. A template consists of HTML5, Javascript, CSS and image files that together form the device graphical interface. Such interface is accessible both from desktop browsers and the Zerynth App. Morevover, by adding the ADM javascript library to the template, a bidirectional communication can be established between the physical device and the template.
- Remote Procedure Call: Python functions on a physical device can be called remotely by sending messages to the ADM that relays them to the device and back.
Interacting with the ADM
The ADM exposes a set of APIs to interact with connected devices. Such APIs are available at https://api.zerynth.com/v1 with the following endpoints:
/ws/uid, opens a websocket for the connected device identified byuid/ws/:uid, opens a websocket for the group of devices identified byuid/devices/uid/call/method, sends a RPC to the connected device to executemethod./devices/uid, opens the connected device graphical interface showing the associated template. If no template is set, the default websocket console for the device is shown.
Templates & Mobile integration
A unique feature of the ADM is the integration of Web 2.0 technologies with connected device. By linking a device to a template (that can be as simple as a single static web page or as complex as a responsive website), the device can be monitored and controlled remotely both on a desktop computer or on a mobile app.
In order to enable bidirectional communication between the template and the device, the only necessary step is to include the ADM javascript library into the template and configure it with the appropriate callbacks.
Here is an example template:
<!DOCTYPE html>
<html lang="en">
  <head>
    <meta charset="utf-8">
    <meta http-equiv="X-UA-Compatible" content="IE=edge">
    <meta name="viewport" content="width=device-width, initial-scale=1">

    <title>Zerynth ADM Template</title>
    <script src="https://ajax.googleapis.com/ajax/libs/jquery/1.12.4/jquery.min.js"></script>
    <script src="https://api.zerynth.com/zadm/latest/z.js"></script>     <!--  INCLUDE THE ZERYNTH ADM JS LIBRARY -->
  </head>
  <body>
    <div id="status" style="text-align:center"> </div>
    <script>
    <!-- CONFIGURE ADM LIBRARY ON READY -->
    $(document).ready(function() {
      Z.init({
        on_connected:     function(){$("#status").html("CONNECTED")},
        on_error:         function(){$("#status").html("ERROR")},
        on_disconnected:  function(){$("#status").html("DISCONNECTED"); return true},
        on_online:        function(evt){$("#status").html("ONLINE");},
        on_offline:       function(evt){$("#status").html("OFFLINE");},
        on_event:         function(evt){$("#status").html("EVENT!");},
        on_notify:        function(evt){$("#status").html("NOTIFICATION!");}
      })
    });
    </script>
  </body>
</html>
The template automatically connects to the ADM requesting access to the device uid specified in the url. It also reacts to events coming from the ADM by configuring a set of callbacks.
In particular, the ADM Javascript library provides a global object Z that accepts the following callbacks in its init method:
on_connected, is called when the template successfully connects to the ADMon_disconnected, is called when the template disconnects from the ADM. If the callback returns true, an attempt of reconnection is madeon_error, is called when the template connection to the ADM can’t be establishedon_online, is called when the device connects to the ADMon_offline, is called when the device disconnects from the ADMon_event, is called when the device sends an event message to the ADMon_notify, is called when the device sends a mobile notification request to the ADM
The Z object can also send messages to the device or group with the following methods:
call(method,args,callback), ask the connected device(s) to execute methodmethodwith argumentsargs(as an array of objects). If given,callbackis executed whenmethodcompletes.send_raw(txt), accepts a string representing a valid JSON message and relays it to the connected device(s)
Valid JSON messages accepted by the ADM for RPC are:
{
    "cmd":"CALL",
    "method":"random",
    "args":[0,20],
    "cid": "4661c53b-ca74-4aef-8117-916b09400253"  //a unique identifier for the call
}
Messages coming from devices have the following format:
//Event message
{
    "cmd":"EVNT",
    "payload":{
        // custom fields
    }
}

//Notification message (to send push notifications from the device to the Zerynth App)
{
    "cmd":"NTFY",
    "payload":{
        "title":"Notification title",
        "text":"Notification body"
    }
}

//Return message (in response to a "CALL" message)
{
    "cmd":"RETN",
    "res": ... //result of method call
    "cid": "4661c53b-ca74-4aef-8117-916b09400253"  //the unique identifier for the call
}
Zerynth Studio integration
All the ADM features can be readily accessed from Zerynth Studio. On the Left Panel, by clicking the ADM icon, the list of connected devices is retrieved and displayed. New device can be created from the dropdown menu next to the panel title.
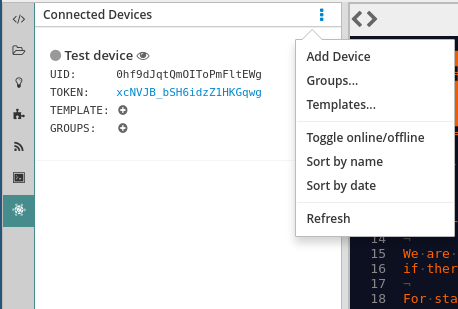
As shown in the above image, a newly created connected device is assigned a uid and a security token. A new token can be requested by clicking on the old one. The connected device is associated to the default template and doesn’t belong to any group. Templates and groups can be added by clicking the respective “plus” icon.
The circle to the left of the device name is gray, indicating the offline status of the device; it turns to green when the device connects to the ADM. The eye icon to the right of the name, opens the associated template of the device on a system browser tab in order to allow template testing.
To test the connected device, a physical device must be programmed with a script based on lib.zerynth.adm using uid and token as credentials.
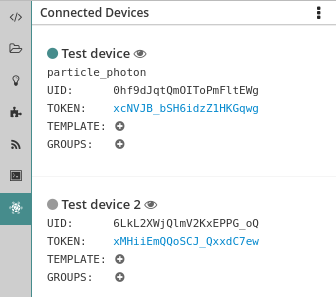
Once the physical device connects to the ADM, its type is automatically added to the connected device instance (in the above image is Particle Photon). By clicking the eye icon, the default template for the connected device is opened and incoming messages can be monitor. RPC calls can be made as well, directly from the template by typing JSON messages in the dedicated field.

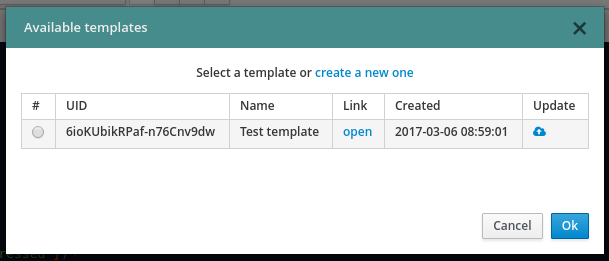
A new template can be created by clicking on the plus icon of the connected device or from the panel dropdown menu. On the dialog that appears, by clicking the upload icon, the folder containing the template files can be selected and uploaded to the ADM. Templates are therefore “independent” from devices and projects: a template can live in its own folder and can be associated to multiple connected devices.
Important
In each template there must be an index.html file that will be served by the ADM when the device UI is requested
Connected devices can also be added to groups, and groups can be created and assigned easily from Zerynth Studio.
If the device supports FOTA updates, the FOTA process can be performed directly from Zerynth Studio.
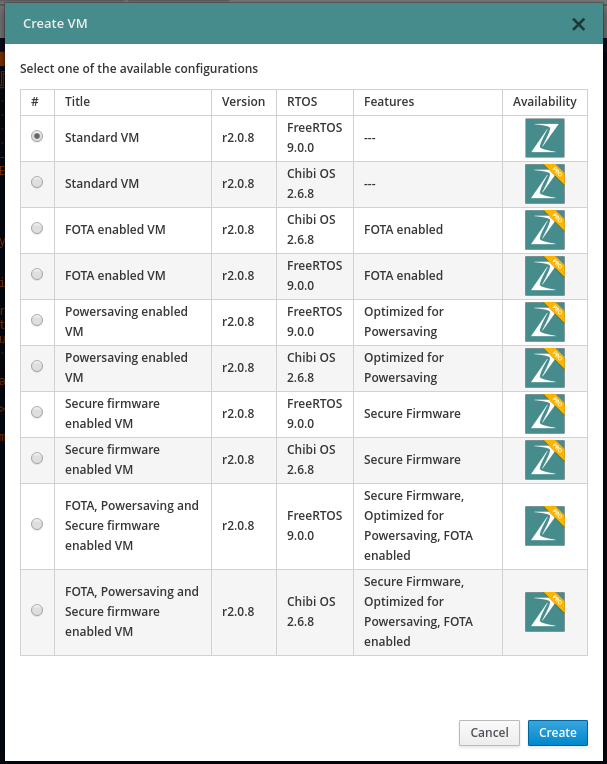
FOTA Updates
FOTA enabled Virtual Machines allow the running bytecode (and VM if supported) to be updated remotely; just select a FOTA VM during virtualization:
The FOTA process can be performed “manually” by using the low level libraries offered by the standard library. However, by using the Zerynth ADM, its Python library and Zerynth Studio (or the ZTC) together, the FOTA process can be extremely simplified.
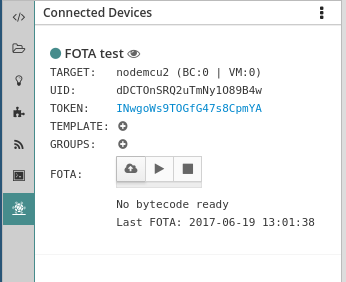
Once a device running a FOTA enabled VM connects to the ADM via lib.zerynth.adm, it automatically sends the required FOTA information, namely:
- the type of device
- the VM unique identifier
- the current bytecode and VM slots
- the preferred size of update blocks
This information can be retrieved in details with a dedicated ZTC command and it is also summarized in Zerynth Studio in the ADM panel:
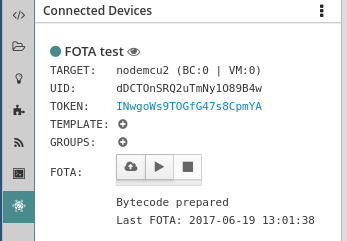
In order to run the FOTA process, the correct firmware to send to the device must be prepared first. The firmware preparation can be done manually with the ZTC link command followed by the ZTC ota prepare command; from Zerynth Studio, firmware preparation can be done by simply pressing the upload button (see Figure).
Once the new firmware is prepared, the FOTA process can be started with the ZTC ota start command or by pressing the “play” button (see Figure). Once the FOTA process is started, the ADM divides he new firmware in small blocks and sends each one of them to the device that checks and writes them on the device memory. The FOTA process can be slow, however one of the advantages of the FOTA enabled VM is that the FOTA happens while the rest of the firmware keeps running normally, reducing the offline time of the device greatly.
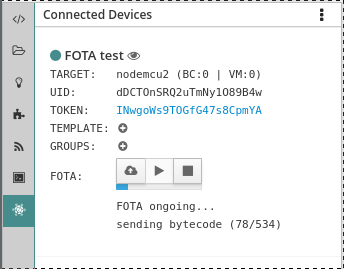
While the FOTA process is ongoing, it can be stopped with the ZTC ota stop command or by pressing the stop button (see Figure).
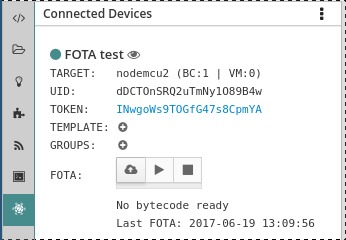
Once the device restarts after the transfer of all the blocks, two things can happen:
- the new firmware works correctly and reconnects to the ADM confirming the success of the FOTA process; from now on, a device restart will execute the new firmware (and the new VM if supported)
- the new firmware doesn’t work correctly; on device reset, the last working firmware (and VM) is executed
Note
FOTA updates of Virtual Machine are not yet supported from Zerynth Studio, they must be prepared and started from ZTC. However, they can still be monitored from the Studio.